

Text size:
Tweaking your X configuration manually…
Most of the time, software either "just works" or provides some method to correct the larger problems. The smaller details that need tweaking are, however, where Open Source Software and proprietary software tend to have differences of opinion. Everything is tweakable in Open Source Software, even if the methods aren't immediately obvious. Indeed, many settings are either hidden (because hardly ever used) or even only accessible by making changes to the source code (because the author didn't foresee the need to change them). On the other hand, proprietary software only allows you to make changes to parameters that are documented, and if ever you need to change something that's not documented you're basically out of luck.
The reason this howto was written is a minor problem I was experiencing with my new LCD monitor that required a little adjustment in order to remove a minor annoyance.
I use Slackware Linux on my computer, and the Linux kernel can start up in what's known as framebuffer mode, the main advantage of which is having a
Tux logo on the screen when the kernel bootsfar greater resolution console than the standard 80×25 text mode on x86 hardware. Running at 1280×1024 I get the equivalent of a 160×64 character console.To start with, I was running the monitor in X at 1280×1024 resolution at the maximum admissible refresh rate of 75Hz, while the framebuffer console would make the graphics card output at 60Hz. The difference in refresh rates meant that the monitor would consider the two display modes as entirely different despite the identical resolutions. In other words, making adjustments to the monitor while in X would not affect how it displayed the framebuffer console, and vice-versa.
One problem of running the monitor at such a comparatively high refresh rate (for an LCD, which doesn't suffer from the same flicker problem as a CRT monitor) was a slight horizontal instability at the right-hand edge of the screen. The image would appear to shimmer slightly, as if being viewed through a heat haze. Given that one of the reasons for using an LCD display in the first place is the stability of its flicker-free display, this wasn't wholly satisfactory, so I decided to tone down the admissible ranges in the HorizSync and VertRefresh entries of my /etc/X11/xorg.conf file. This succeeded in slowing down the output sent to the monitor and resulted in a stable image, but it introduced a secondary problem.
Both while in X and in framebuffer console mode, the graphics card outputs images at 60Hz (remember, this is an LCD monitor so the low refresh rate isn't a problem). This means that the monitor considers them both as the same display mode − and technically, it is entirely correct − which in turn means that changes made while in framebuffer mode will affect how the screen displays X and vice-versa.
This wouldn't be a problem if X didn't use slightly different timings than the framebuffer. In order to explain this we're going to have to look at the basics of how a graphics card generates an image and how the monitor reproduces it.
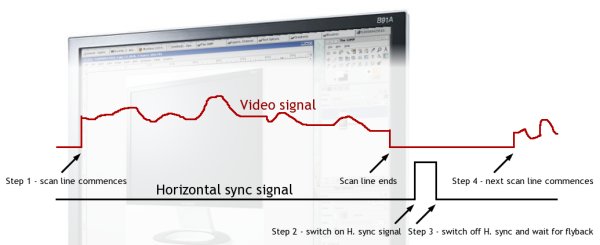
Forget that I have an LCD monitor for now and think of graphics cards as having to deal with the only technology available at the time they were invented: CRT monitors. The image had to be output one scan line at a time following this routine for each one:
- Output the analog data for the three basic colors so that the cathode rays can draw it onto the screen.
- When we get to the end of the line, output a signal called "horizontal sync", which tells the monitor to blank the cathode rays and make the beam fly back to the left of the screen ready to draw the next line.
- Pause for a fraction of a second to allow the flyback to complete and to allow the electronics to settle ready for the next line to be output.
- Go back to step 1. for the next line.
This image probably illustrates the principle better than any number of words:
The number of times the graphics card goes through the above cycle in a one second period is the Horizontal sync rate and is expressed in Hertz (Hz) or multiples thereof, such as the Kilohertz − 1kHz = 1000Hz. Typical admissible values that a present-day multisync CRT can keep up with are in the 40kHz to 100kHz range. LCD monitors have a narrower acceptable horizontal sync range, typically from about 50kHz to 80kHz.
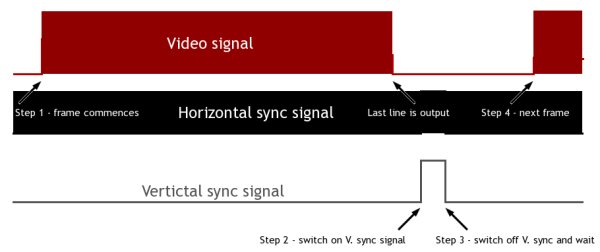
Displays are two-dimensional, meaning that you have to account for frames (vertical dimension) as well as lines (horizontal dimension). So, graphics cards also have to observe this procedure:
- Go through the steps listed above for each of the lines to be displayed.
- Output a "vertical sync" signal telling the monitor to blank its electron beams and pull them back up to the top of the screen ready for the next frame.
- Pause to allow the vertical retrace to complete and to wait for the electronics to stabilize ready for the next frame.
- Go back to step 1. for the next frame.
In the graphic below, which illustrates this, we've had to slow the time-line down so much in order to view the vertical refresh signal that the video and horizontal sync signals are just an undiscernible blur:
The number of times the graphics card goes through this cycle in a second is the Vertical refresh rate and is also expressed in Hz. Typical refresh rates that CRT monitors are able to keep up with are in the 50Hz to 100Hz range. Once again, LCD monitors aren't able to work so quickly and have refresh rate ranges nearer 55Hz to 75Hz.
The driving force behind all of the timings involved is the Pixel Clock. One pixel of image data is output by the graphics card for each tick of the pixel clock. The higher a pixel clock your graphics card has, the faster it can send the image out to the monitor. However, the monitor might have a limitation on the speed at which it can change the colors it draws on the screen. This limitation is its acceptable bandwidth. If the graphics card outputs image data to the monitor at a rate beyond the monitor's bandwidth, the image will be blurry because it wasn't possible to change the colors being drawn on the screen quickly enough. A good present-day CRT will have an acceptable bandwidth of around 200MHz. LCD monitors have a bandwidth about half that.
The pixel clock never stops ticking. Even when nothing is actually being drawn on the screen (during horizontal flyback and/or vertical retrace, for example) it's still ticking away because it is used to increment a counter inside the graphics controller at each tick. It's this counter that's used to define when to move on from one step to the next during the process of outputting a line of image data to the monitor.
The whole process of outputting a line is completely cyclic so it doesn't really matter where you start counting. The convention used in X is to start from zero as of the first pixel in the line. A parameter called HDisplay is the number of pixel clock ticks during which video data should be output. This is in fact the horizontal resolution of your display.
As soon as the internal counter driven by the pixel clock reaches HDisplay, the display is shut off and we prepare to send the horizontal sync signal. This happens when the internal counter raches a value called HSyncStart. This is step 2 described above.
Step 3 above occurs when the internal counter reaches the value called HSyncEnd, and we switch off the horizontal sync signal and wait to start the process over for the next line.
The whole cycle starts over when the internal counter reaches a value called HTotal (step 4). The counter is reset and output of a new line begins.
For my own setup, the values are as follows:
Pixel clock 108MHz HDisplay 1280 HSyncStart 1346 HSyncEnd 1458 HTotal 1688 If the whole cycle of outputting a line takes 1688 clock ticks, and if the clock is ticking at 108MHz, then my graphics card is outputting lines at a rate of:
( 108 × 10^6 ) ÷ 1688 = 63,981
Rounded to the nearest 100Hz that works out at 64kHz. This is therefore the first relationship between the values X works with and those that you may be more familiar with:
H. sync rate = Pixel Clock ÷ HTotal
The time devoted to processing one pixel is:
1 ÷ ( 108 × 10^6 ) = 9.259ns
The time taken by the graphics card to process a line entirely is:
1688 ÷ ( 108 × 10^6 ) = 15.63µs
The length of the horizontal sync pulse is:
( 1458 - 1346 ) ÷ ( 108 × 10^6 ) = 1.037µs
The wait beween the sync pulse and beginning the next line is:
( 1688 - 1458 ) ÷ ( 108 × 10^6 ) = 2.13µs
These other relationships are:
Pixel period = 1 ÷ Pixel Clock
Horizontal period = HTotal × Pixel period = HTotal ÷ Pixel Clock
Horizontal sync pulse length = ( HSyncEnd - HSyncStart ) ÷ Pixel Clock
Flyback length = ( HTotal - HSyncEnd ) ÷ Pixel ClockAll of these parameters relate to technical characteristics that may be subject to limits of your monitor.
The pixel period and clock you can use are limited by your monitor's bandwidth. The horizontal period and sync rate (one is the reciprocal of the other) must not exceed the limits of the monitor's capabilities. Getting the length of the horizontal sync pulse right is a balancing act between making it long enough for the monitor to actually "see" it and short enough to leave sufficient time for the flyback. The flyback length has to be long enough to allow the monitor's electronics time to yank the electron beam back to the left-hand side of the screen and settle prior to beginning the next line.
Not only is the pixel counter reset when it reaches HTotal, but another internal counter, the line counter, is incremented at the same time. Outputting frames of video data is also cyclic so it doesn't matter where you start counting here either. The convention adopted by X is to start from zero at the first line of the frame.
For each Hxxxxx value there's a corresponding Vxxxxx value that's relevant to the line count. Thus, lines are output until the line counter reaches VDisplay, which is the vertical resolution of your monitor. Step 2 in the vertical cycle is attained when the line counter reaches VSyncStart, step 3 when it reaches VSyncEnd, and when the line counter reaches VTotal (step 4) it is reset and the whole process starts over with a new frame.
Data from my own setup is as follows:
VDisplay 1024 VSyncStart 1025 VSyncEnd 1028 VTotal 1066 If you take the number of lines produced by the graphics adapter in a second and divide it by VTotal, the number of lines making up a frame, then you get the number of frames produced in a second, the Vertical refresh rate:
Vertical refresh rate = Horizontal sync rate ÷ VTotal, or
Vertical refresh rate = ( Pixel clock ÷ HTotal ) ÷ VTotal, or by applying basic rules ot math
Vertical refresh rate = Pixel clock ÷ ( HTotal × VTotal )
In my case: Vertical refresh rate = ( 108 × 10^6 ) ÷ ( 1688 × 1066 ) = 60.02Hz
Vertical sync pulse length = ( VSyncEnd - VSyncStart ) × Horizontal period, or
Vertical sync pulse length = ( VSyncEnd - VSyncStart ) × ( HTotal ÷ Pixel clock )
In my case: Vertical sync pulse length = ( 1028 - 1025 ) × ( 1688 ÷ ( 108 × 10^6 ) ) = 46.89µs
Vertical retrace length = ( VTotal - VSyncEnd ) × Horizontal period, or
Vertical retrace length = ( VTotal - VSyncEnd ) × ( HTotal ÷ Pixel clock )
In my case: Vertical retrace length = ( 1066 - 1028 ) × ( 1688 ÷ ( 108 × 10^6 ) ) = 593.9µsThe same remarks regarding technical constraints apply. The vertical refresh rate, sync pulse length and retrace length have to be such that the monitor can operate normally.
The minor annoyance I was having was due to differences in timing between framebuffer mode and X. If the screen was set correctly for the framebuffer console, as soon as I went into X the image would be offset about ¼" to the right. This is because X programs the graphics controller to output the horizontal sync pulse earlier than the framebuffer does. Consequently, HTotal being the same in both modes and HSyncStart/HSyncEnd happening earlier, the time between HSyncEnd and HTotal, which is the flyback length, is greater and the electron beam has long since started to wander across the screen by the time the graphics adapter starts actually outputting video data again. So, the image appears to kick in "late" and is shifted to the right.
Conversely, if I set the screen to display correctly in X, two characters would be missing off the left of the screen as soon as I dropped back to the framebuffer console. The horizontal sync pulse happens later in framebuffer mode than in X, making the flyback time that much shorter. The monitor, being set for the timings used by X, is expecting a much longer flyback length and hasn't yet started drawing the video data when the graphics adapter starts outputting it. This results in video data being "lost" by the monitor − my two characters on the left of the screen − because the monitor wasn't ready for it when the graphics adapter started sending it.
So, the challenge was to get both the framebuffer console and X to use the same timings so that the image would be centred on the screen in both configurations. There may be a way of tweaking the framebuffer's settings, I don't know. I didn't even look because I know how to change the settings of X easily enough by telling it not to use its own default timings and giving it timings of mine to use. Rather than making the timings up from scratch it would be easier to use the default settings as a starting point and delay HSyncStart and HSyncEnd without changing anything else in order to reduce the flyback time by just enough to push the image leftwards to where it should be.
This is where a small piece of software supplied with X called xvidtune comes in handy. As its name suggests, it's purpose is to tune the video output under X.
It has already been mentioned that the timings should not be altered such that they make the graphics adapter output data at rates beyond your monitor's capabilities. Doing so can damage your monitor, and you'll only have yourself to blame. This is why it should come as no surprise that you're given this warning as soon as you start xvidtune:
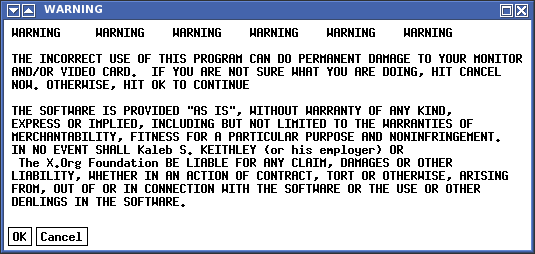
Heed that warning. I cannot be held responsible for damages suffered due to your use of or inability to use the information in this howto document.
Assuming you elected to carry on, you can take a closer look at the information given to you by xvidtune:
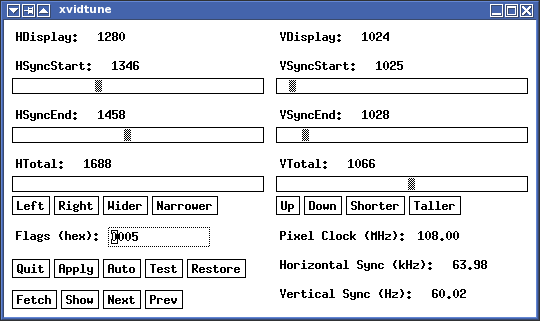
You can make changes then click on "Test" to see the effect (and on "Restore" to revert to the original settings) or you can first click on "Auto" and the changes will be programmed into the graphics controller as soon as they're made and the image adjusted accordingly.
Clicking on "Left" (or "Right") will delay (or advance) HSyncStart and HSyncEnd in order to shift the image laterally.
Clicking on "Wider" (or "Narrower") will decrease (or increase) HTotal thus making HDisplay, ie: the visible part of the line, a greater (or smaller) proportion of HTotal, the entire horizontal cycle. Note that many other parameters are dependent on HTotal. Changing this parameter will affect both the horizontal sync rate and the vertical refresh rate, which are inversely proportional to HTotal.
Similarly, clicking on "Up" (or "down") will delay (or advance) VSyncStart and VSyncEnd in order to shift the image vertically.
Clicking on "Shorter" (or "Taller") will increase (or decrease) VTotal so that VDisplay, ie: the visible part of the frame, becomes a smaller (or greater) part of VTotal, the entire frame cycle. Changing VTotal will also change the vertical refresh rate since the two are inversely proportional.
Once you're satisfied with the timings you can click on "Show" and a string of data will be output to the console from which you started xvidtune. You'll be able to use that string of data, called a "ModeLine", verbatim in the next step.
If, however, you didn't start xvidtune from a console, here's how you make up the ModeLine manually. Firstly, you give the display mode a name. The convention is to use XResolutionxYResolution. You put the name in double quotes, and that's the first piece of information to go into the ModeLine. In my case: "1280x1024".
Secondly, you write down the frequency of the pixel clock in MHz: 108
Next, you simply list out in this order: HDisplay HSyncStart HSyncEnd HTotal. In my case:
1280 1346 1458 1688.Fourthly, you list out the corresponding vertical data: VDisplay VSyncStart VSyncEnd VTotal:
1024 1025 1028 1066Finally, you list out the flags. This is a little more complicated. In the graphics given earlier I depicted the horizontal and vertical sync signals as positive pulses. The line is flat and then rises for the duration of the pulse, to fall back to zero afterwards. Some systems work with negative pulses, in which case the line is high for most of the time, drops to zero for the duration of the pulse and then rises back to its normal state. The two flags we'll be adding to the ModeLine are +hsync or -hsync depending on the polarity of the horizontal sync pulses, and +vsync or -vsync depending on the polarity of the vertical sync pulses. You can either determine the flags to use from the section of the xvidtune display where it says "Flags (hex):" or you can do things the easy way and run xvidtune -show from a console in order to get a copy of the current ModeLine:
$ xvidtune -show
"1280x1024"   108.00   1280 1346 1458 1688   1024 1025 1028 1066 +hsync +vsync
Make a note of this data and now (optionally) log out of X and drop to a console. The next part is to make changes to your X configuration file in /etc/X11. If you're using the X.org implementation of X11 then this file will be xorg.conf. If you're using the XFree86 version then it'll be (if memory serves me correctly, it's a long time since I used XFree86) XF86Config.
Having located your configuration file you need to open it up in your favorite text editor − no, I'm not going to start yet another emacs/vi/pico/nano religious war, use what you're happiest with (it should be nano…) − and make the following changes. You'll probably need to be root in order to write the changes to this file once you're done.
Add this just after the EndSection that denotes the end of the "Monitor" section describing, guess what, your monitor:
# **********************************************************************
# Modes section
# **********************************************************************
Section "Modes"
    Identifier "Custom modes"
    ModeLine "1280x1024"    108   1280 1346 1458 1688    1024 1025 1028 1066 +hsync +vsync
EndSection
…obviously using the ModeLine you extracted from your system, not mine!
The Identifier entry in this section names the bunch of ModeLines it contains. Nothing's to stop you from having custom modelines for each screen resolution you're going to use.
Next we have to tell X to use the ModeLines in this section for its timing instead of its default timings. This is achieved by referring to the "Modes" section in the "Monitor" section. Add this to the latter:
UseModes "Custom modes"The "Custom Modes" is the same as the Identifier in the "Modes" section.
That's all there is to it!. Save the changes to your xorg.conf or XF86Config and restart X. The display should be as you tweaked it with xvidtune.
Last update: 27-FEB-2021
This page has been served 6556
times since 21-MAR-2006